Images are one of the things that make your site attractive to users. But images also can slow down page loading. And Google, like any other search network, hates slow sites. A widely quoted study by the Aberdeen Group found that “A 1-second delay in page load time equals 11% fewer page views, a 16% decrease in customer satisfaction, and 7% loss in conversions.
Trust us, you don’t want Google to hate your website. Fortunately, you can reduce and optimize your image’s file sizes to help improve the website’s performance.
So, in this article, we will show you how to optimize your images for faster web performance without losing quality. And also share automatic image optimization plugins and tools that can make your life easy.
What does it mean to optimize images?
Optimizing images is the process of decreasing file size to speed up the page’s load time.
The goal is to reduce the amount of data users download to get the content they’re looking for faster.
Image optimization also involves labeling your website’s images so search engines can find and understand the page content, which helps you to improve SEO rankings. While the process sounds complex, it’s pretty easy these days. You can use one of the many image optimization plugins and tools to compress images without any visible loss in image quality.
Now that you know a little more about how image optimization affects a website let’s talk about how you can do it.
How to optimize images for web: Tips and best practices
According to HTTP Archive, as of November 2018, images make up 21% of a total webpage’s weight on average. However, many people still ignore this fact.
Ideally, your website should load within two-three seconds. The two-to-three second mark is the turning point where bounce rates skyrocket – in fact, 40% of consumers will wait no more than three seconds before abandoning a site.
As an option, you can use “lazy loading.” Lazy loading is a strategy to identify resources as non-blocking (non-critical) and load these only when needed. It’s a way to shorten the length of the critical rendering path, which translates into reduced page load times.
Lazy loading can occur at different moments in the application, but it typically happens during user interactions, such as scrolling and navigation.
Image compression is a great way to achieve the numbers required by search engines, which plays a huge role in image optimization.
Choose the right file type before uploading
Before modifying your images, make sure you’ve chosen the best file type. The most common file types are:
PNG – produces high-quality images but also has a larger file size. This format was created as a lossless image format, although it can also be lossy. PNG is ideal for flat images like logos and icons.
JPEG – you can balance the quality and file size by adjusting the JPEG quality level. This file format is best for photos.
GIF – only uses 256 colors and can hold multiple pictures at once. It only uses lossless compression. GIFs are used to create simple animations and are the best choice for animated images.
You may also want to use SVGs to display abstract illustrations, such as background shapes, rather than images. It is because SVGs are text-based XML files that describe an image, which means they have a significantly smaller footprint.
1. Reduce image file size
There are different types and levels of image compression available. The settings for each will vary depending on your image compression tool.
You can resize images by adjusting the pixel dimensions using photo editing software like Photoshop or Lightroom, which allows you to fit the image to your space without sacrificing quality. We also gathered some great online tools that help compress your images without losing quality.
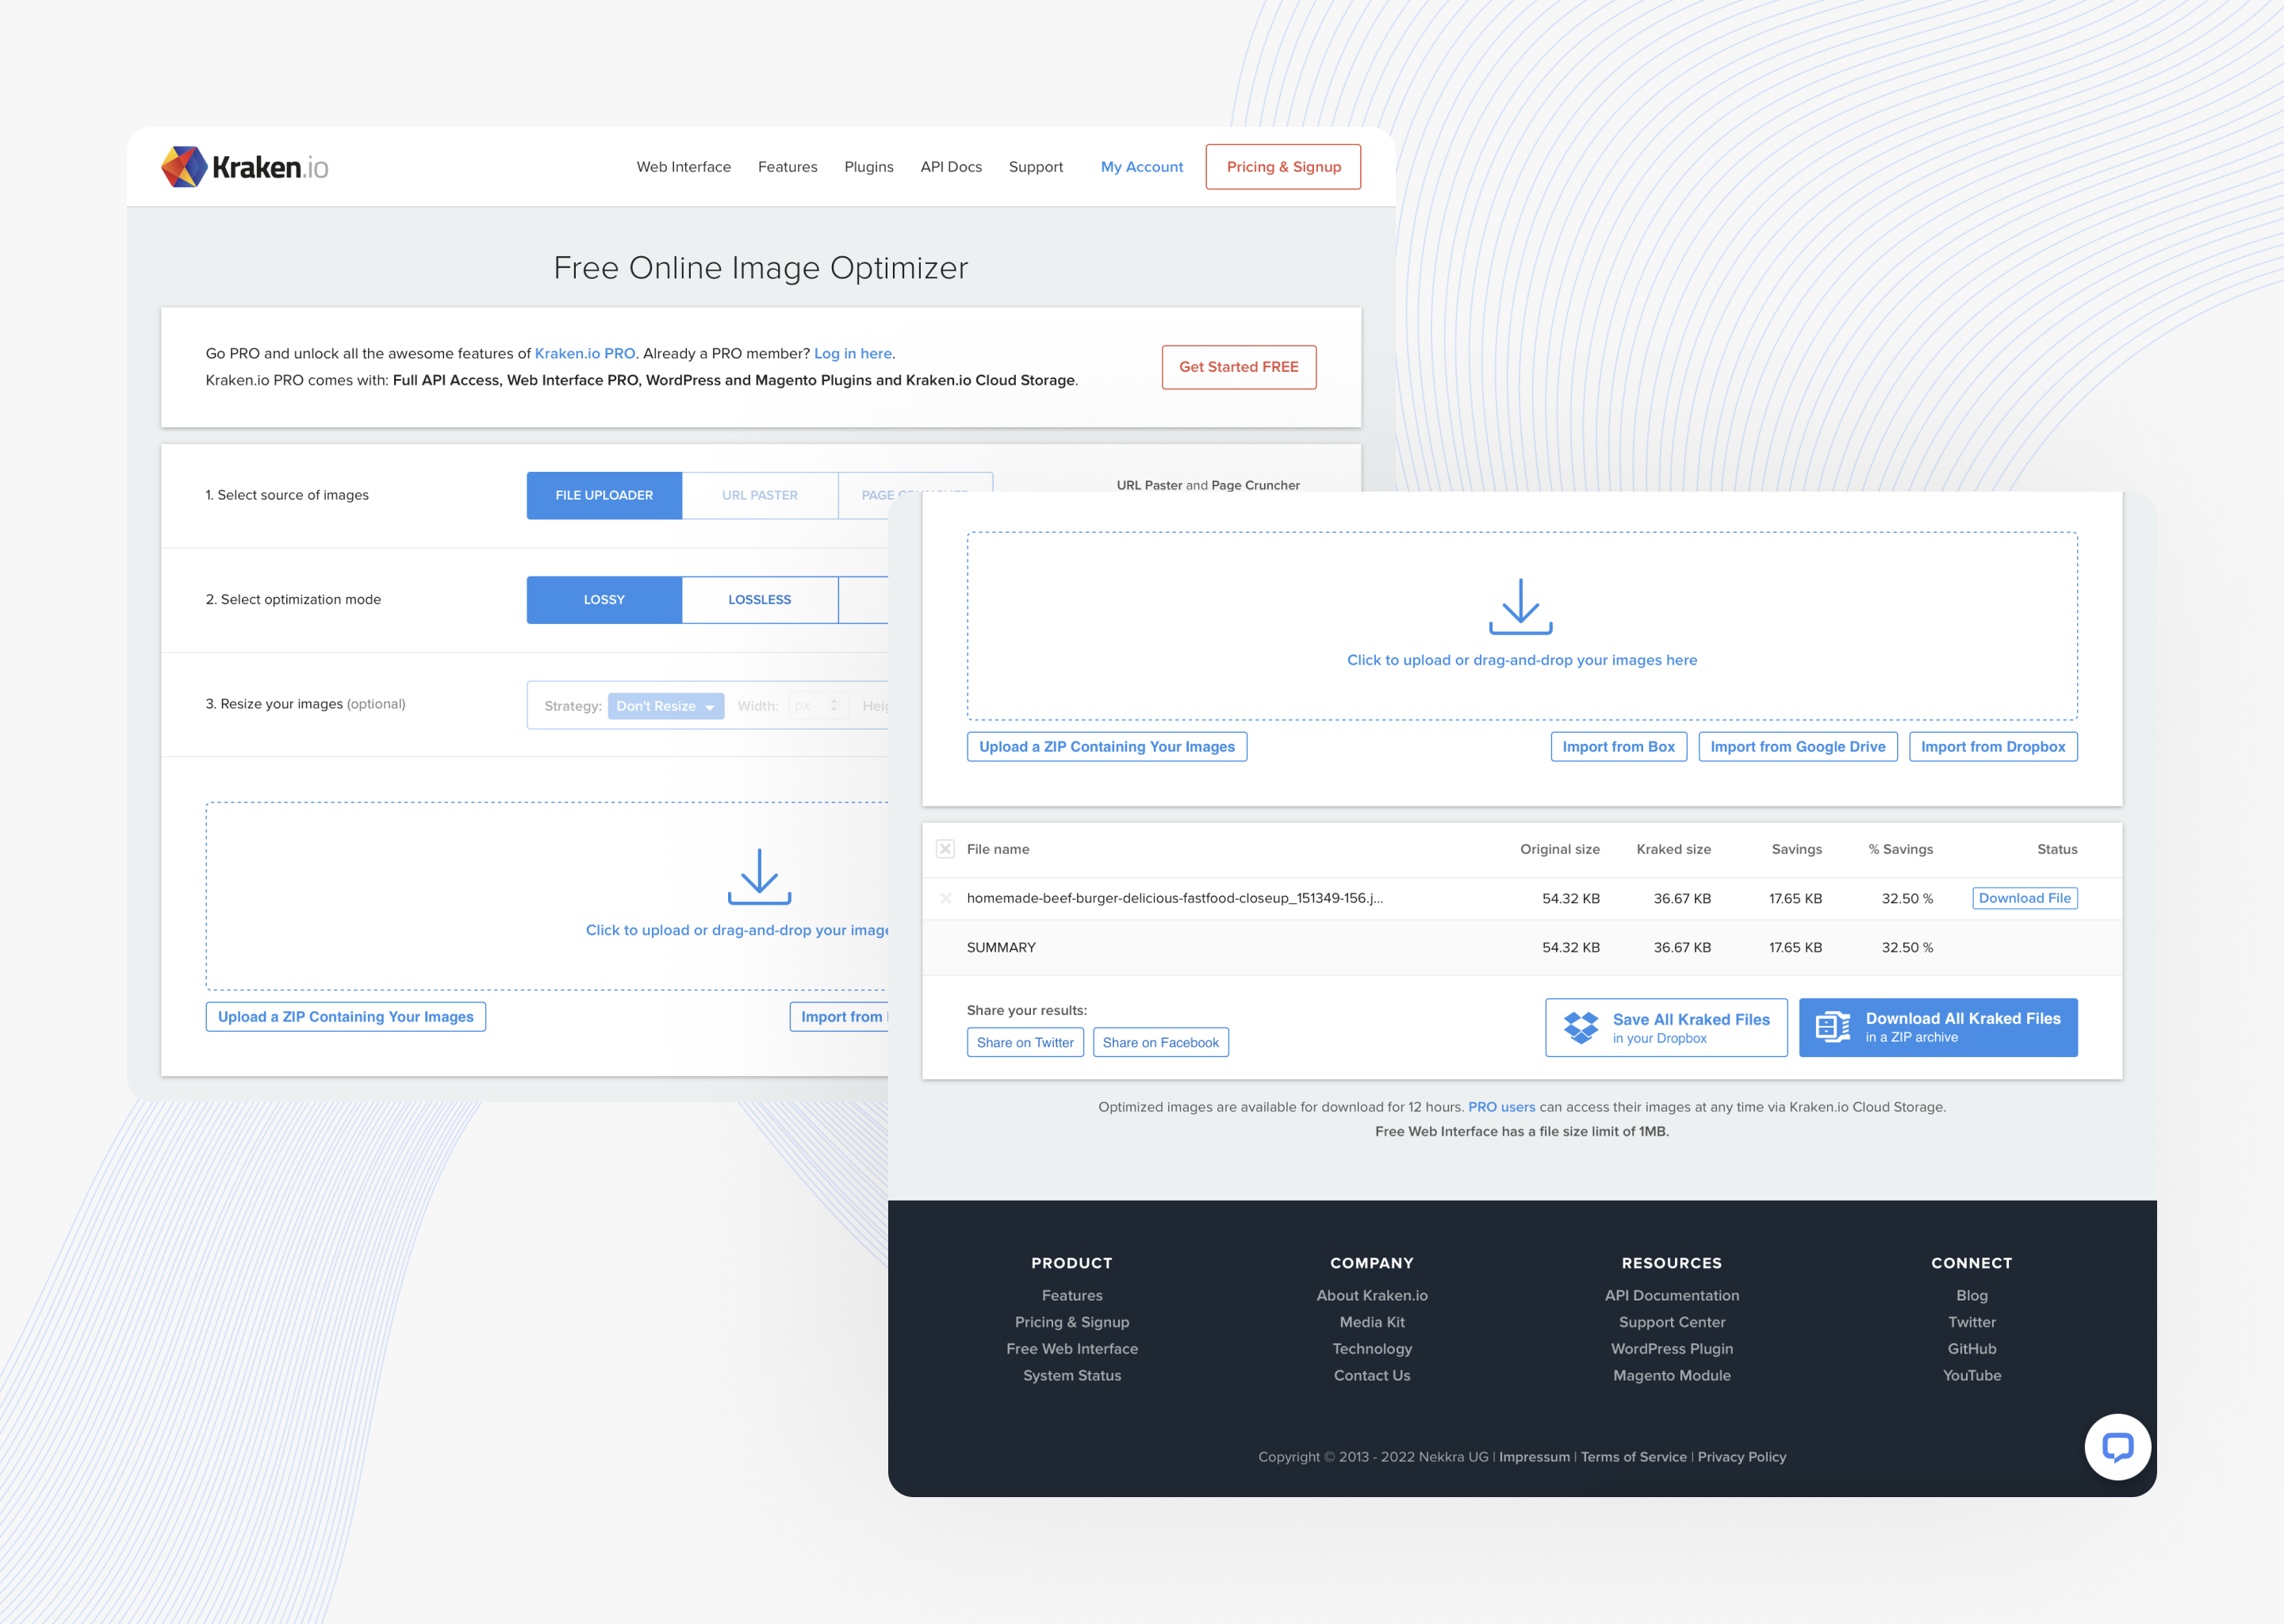
1. Kraken
Kraken allows you to optimize not just JPEG but PNG and GIFs as well. Files up to 1 MB are optimized for free. Bigger files need you to go with their Pro package.
Kraken gives you a choice of compression modes:
Lossless – zero drop in quality.
Lossy – a small drop in quality, but cuts down image file size by almost 90%.
It would be best if you opted for the lossless to retain 100% visual information.
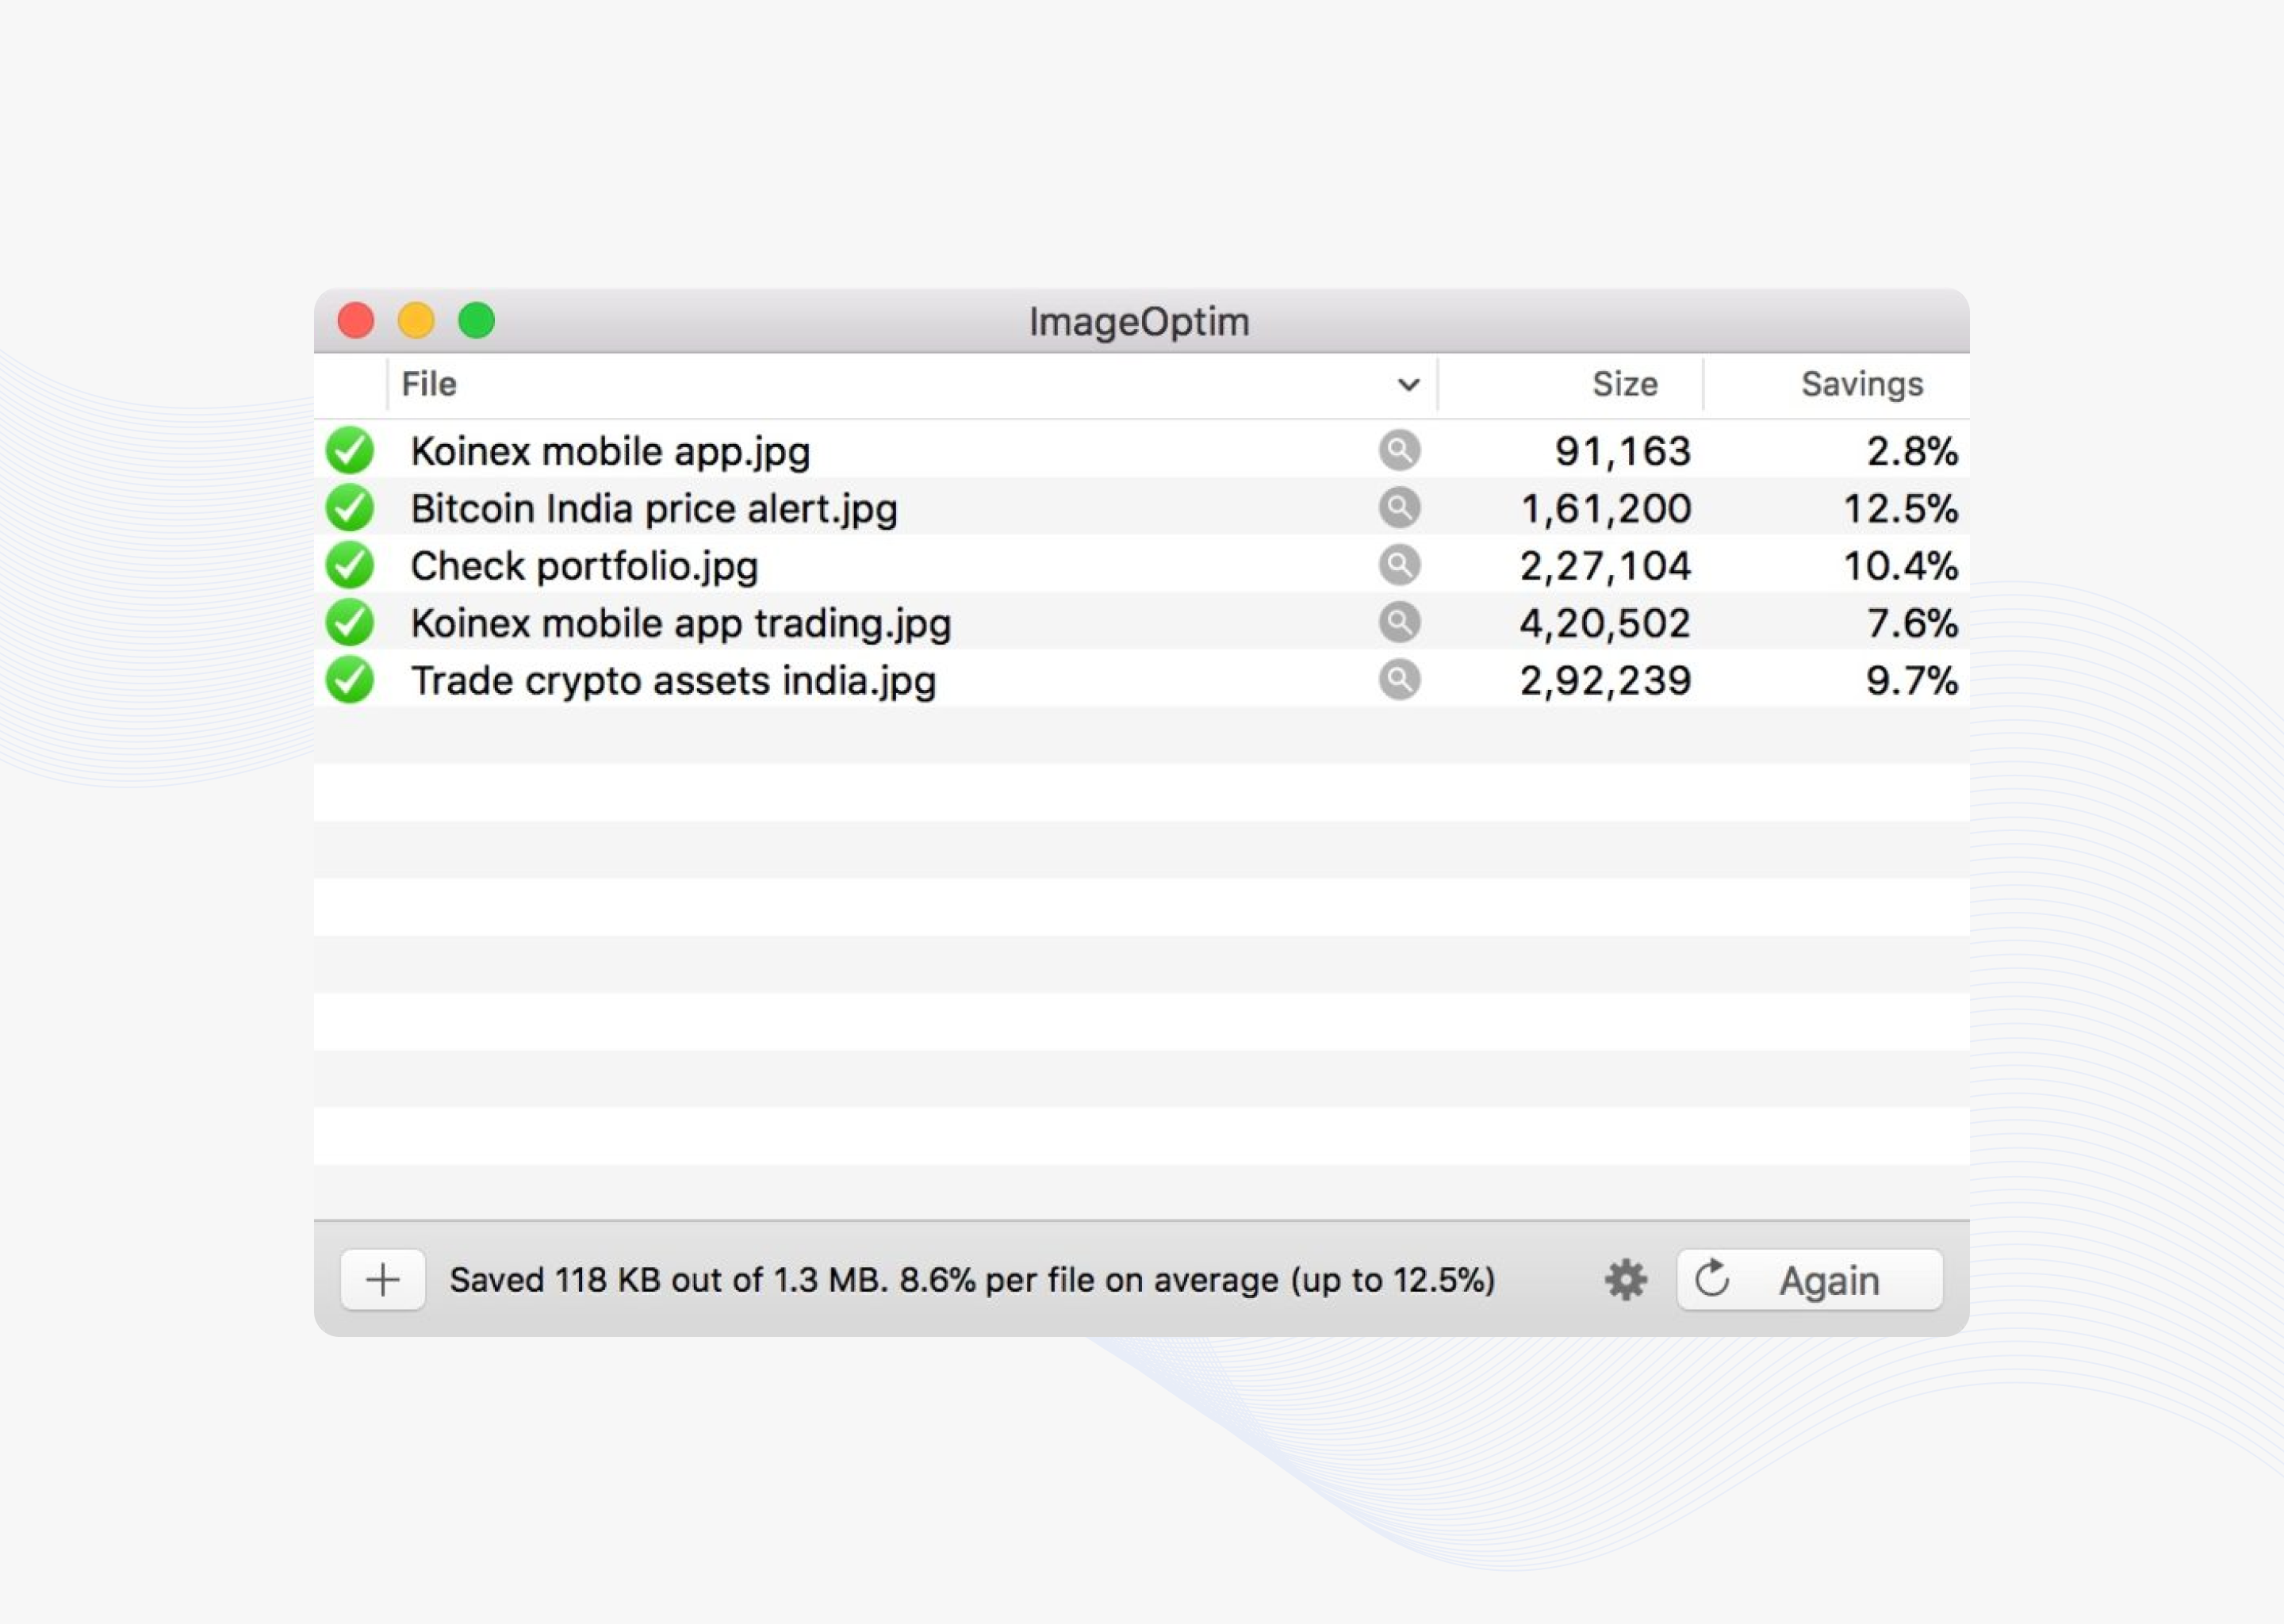
2. ImageOptim
It’s Mac software (Requires macOS 10.9+.). ImageOptim help compress files in .jpg, .svg, .png formats. You also can optimize multiple images at once.
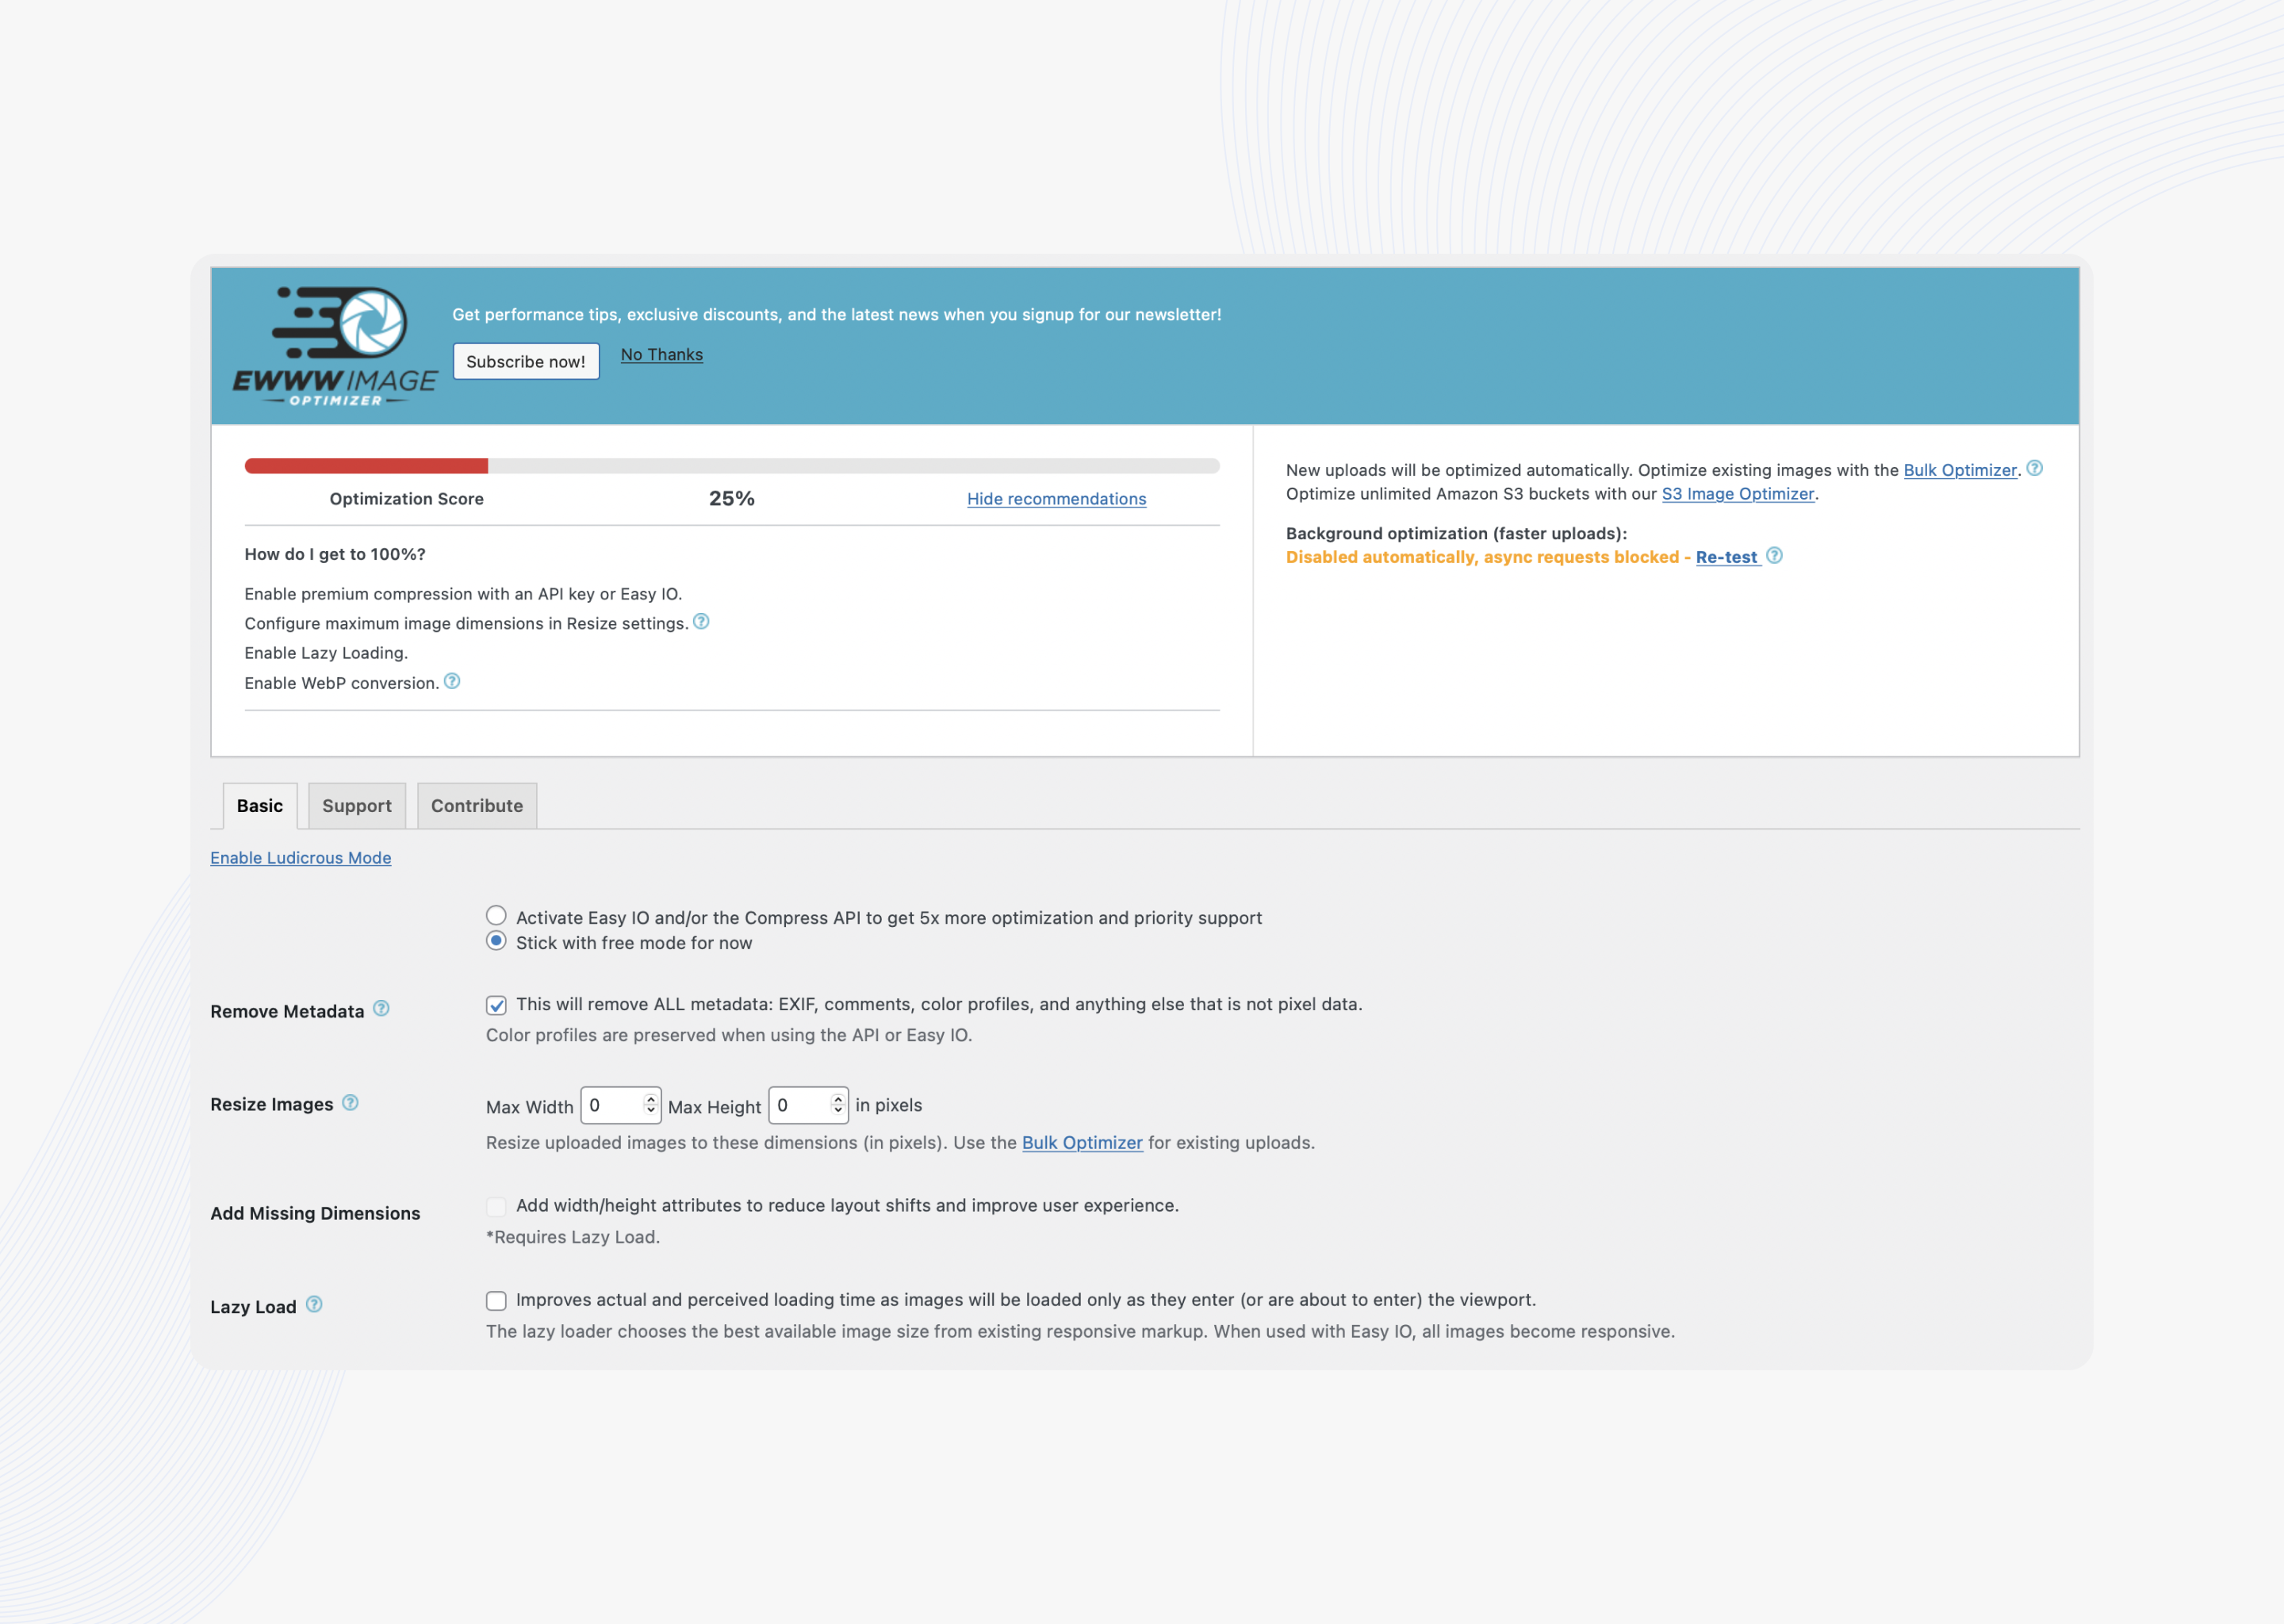
EWWW Image Optimization Cloud is a very effective and powerful tool for speeding up your WordPress site. The plugin has adaptive steering with intelligent conversion options to get the right image format for the job (JPG, PNG, GIF, or WebP).
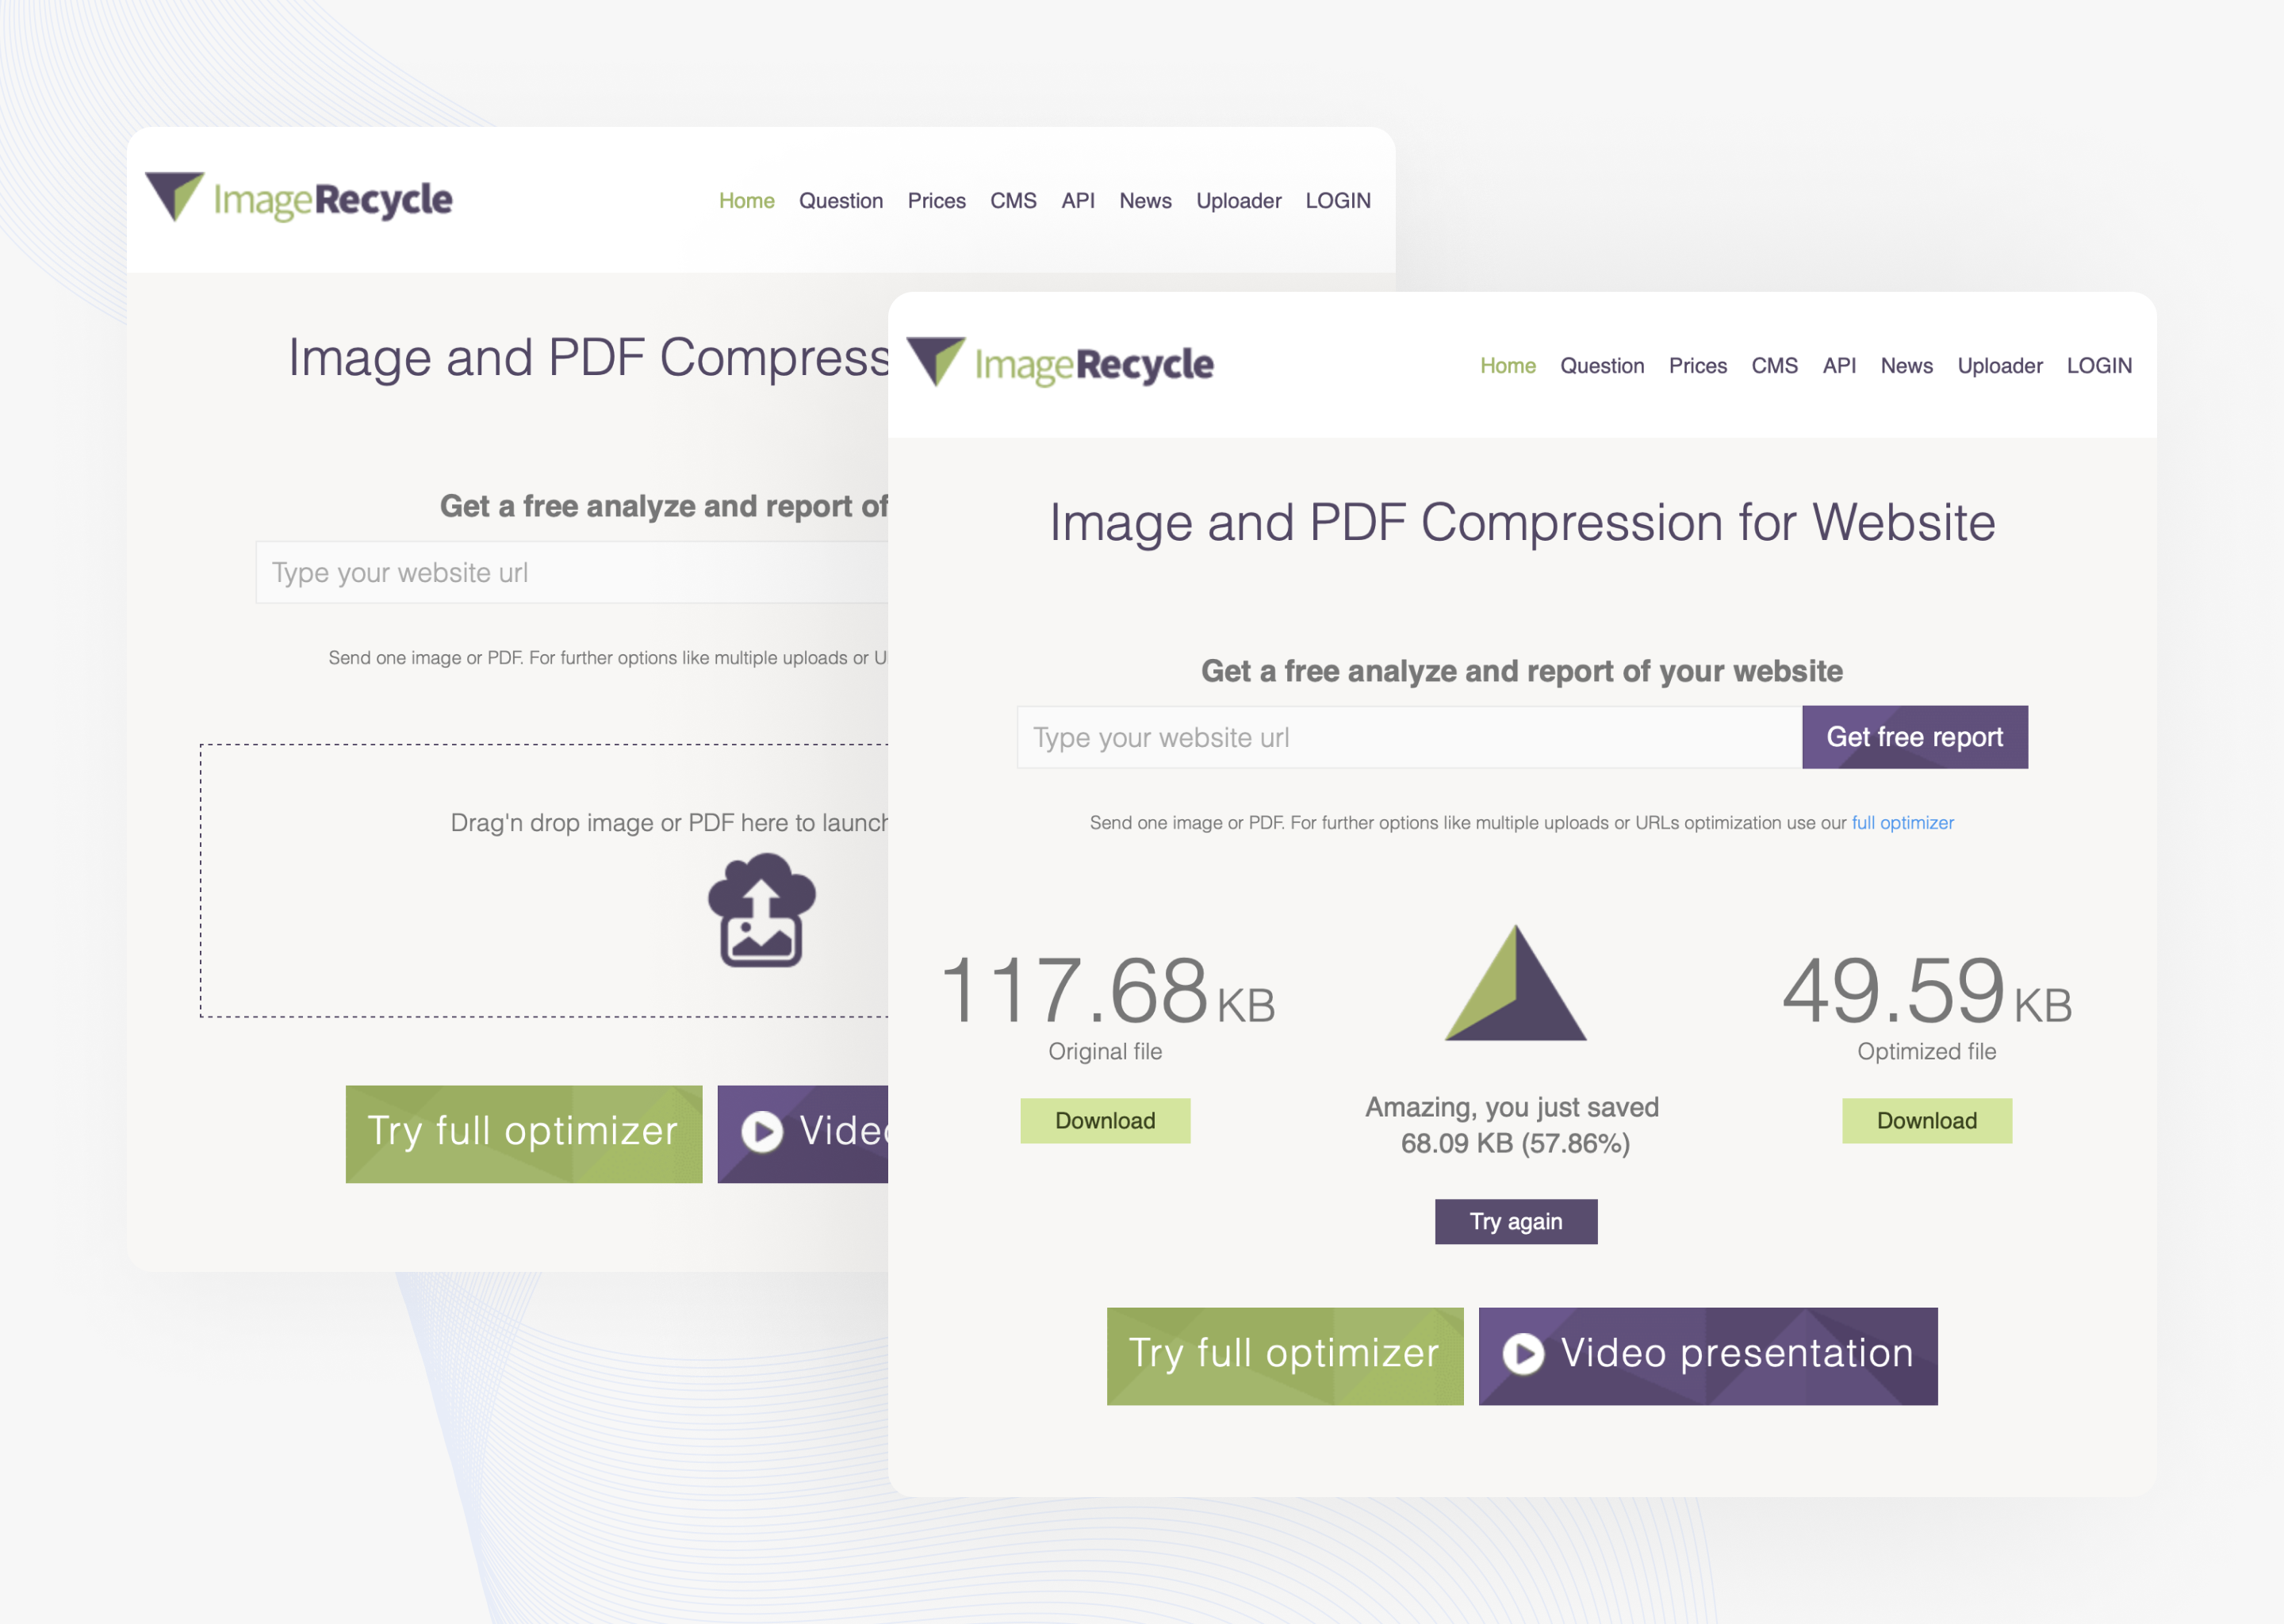
4. ImageRecycle
Not just PNG or JPEG, this tool supports even GIFs and PDFs. Moreover, you can drag and drop your images to the website and download the optimized images with a click.
Compression:
JPEG Image file saving: 48.97%
PNG Image file saving: 78.57%
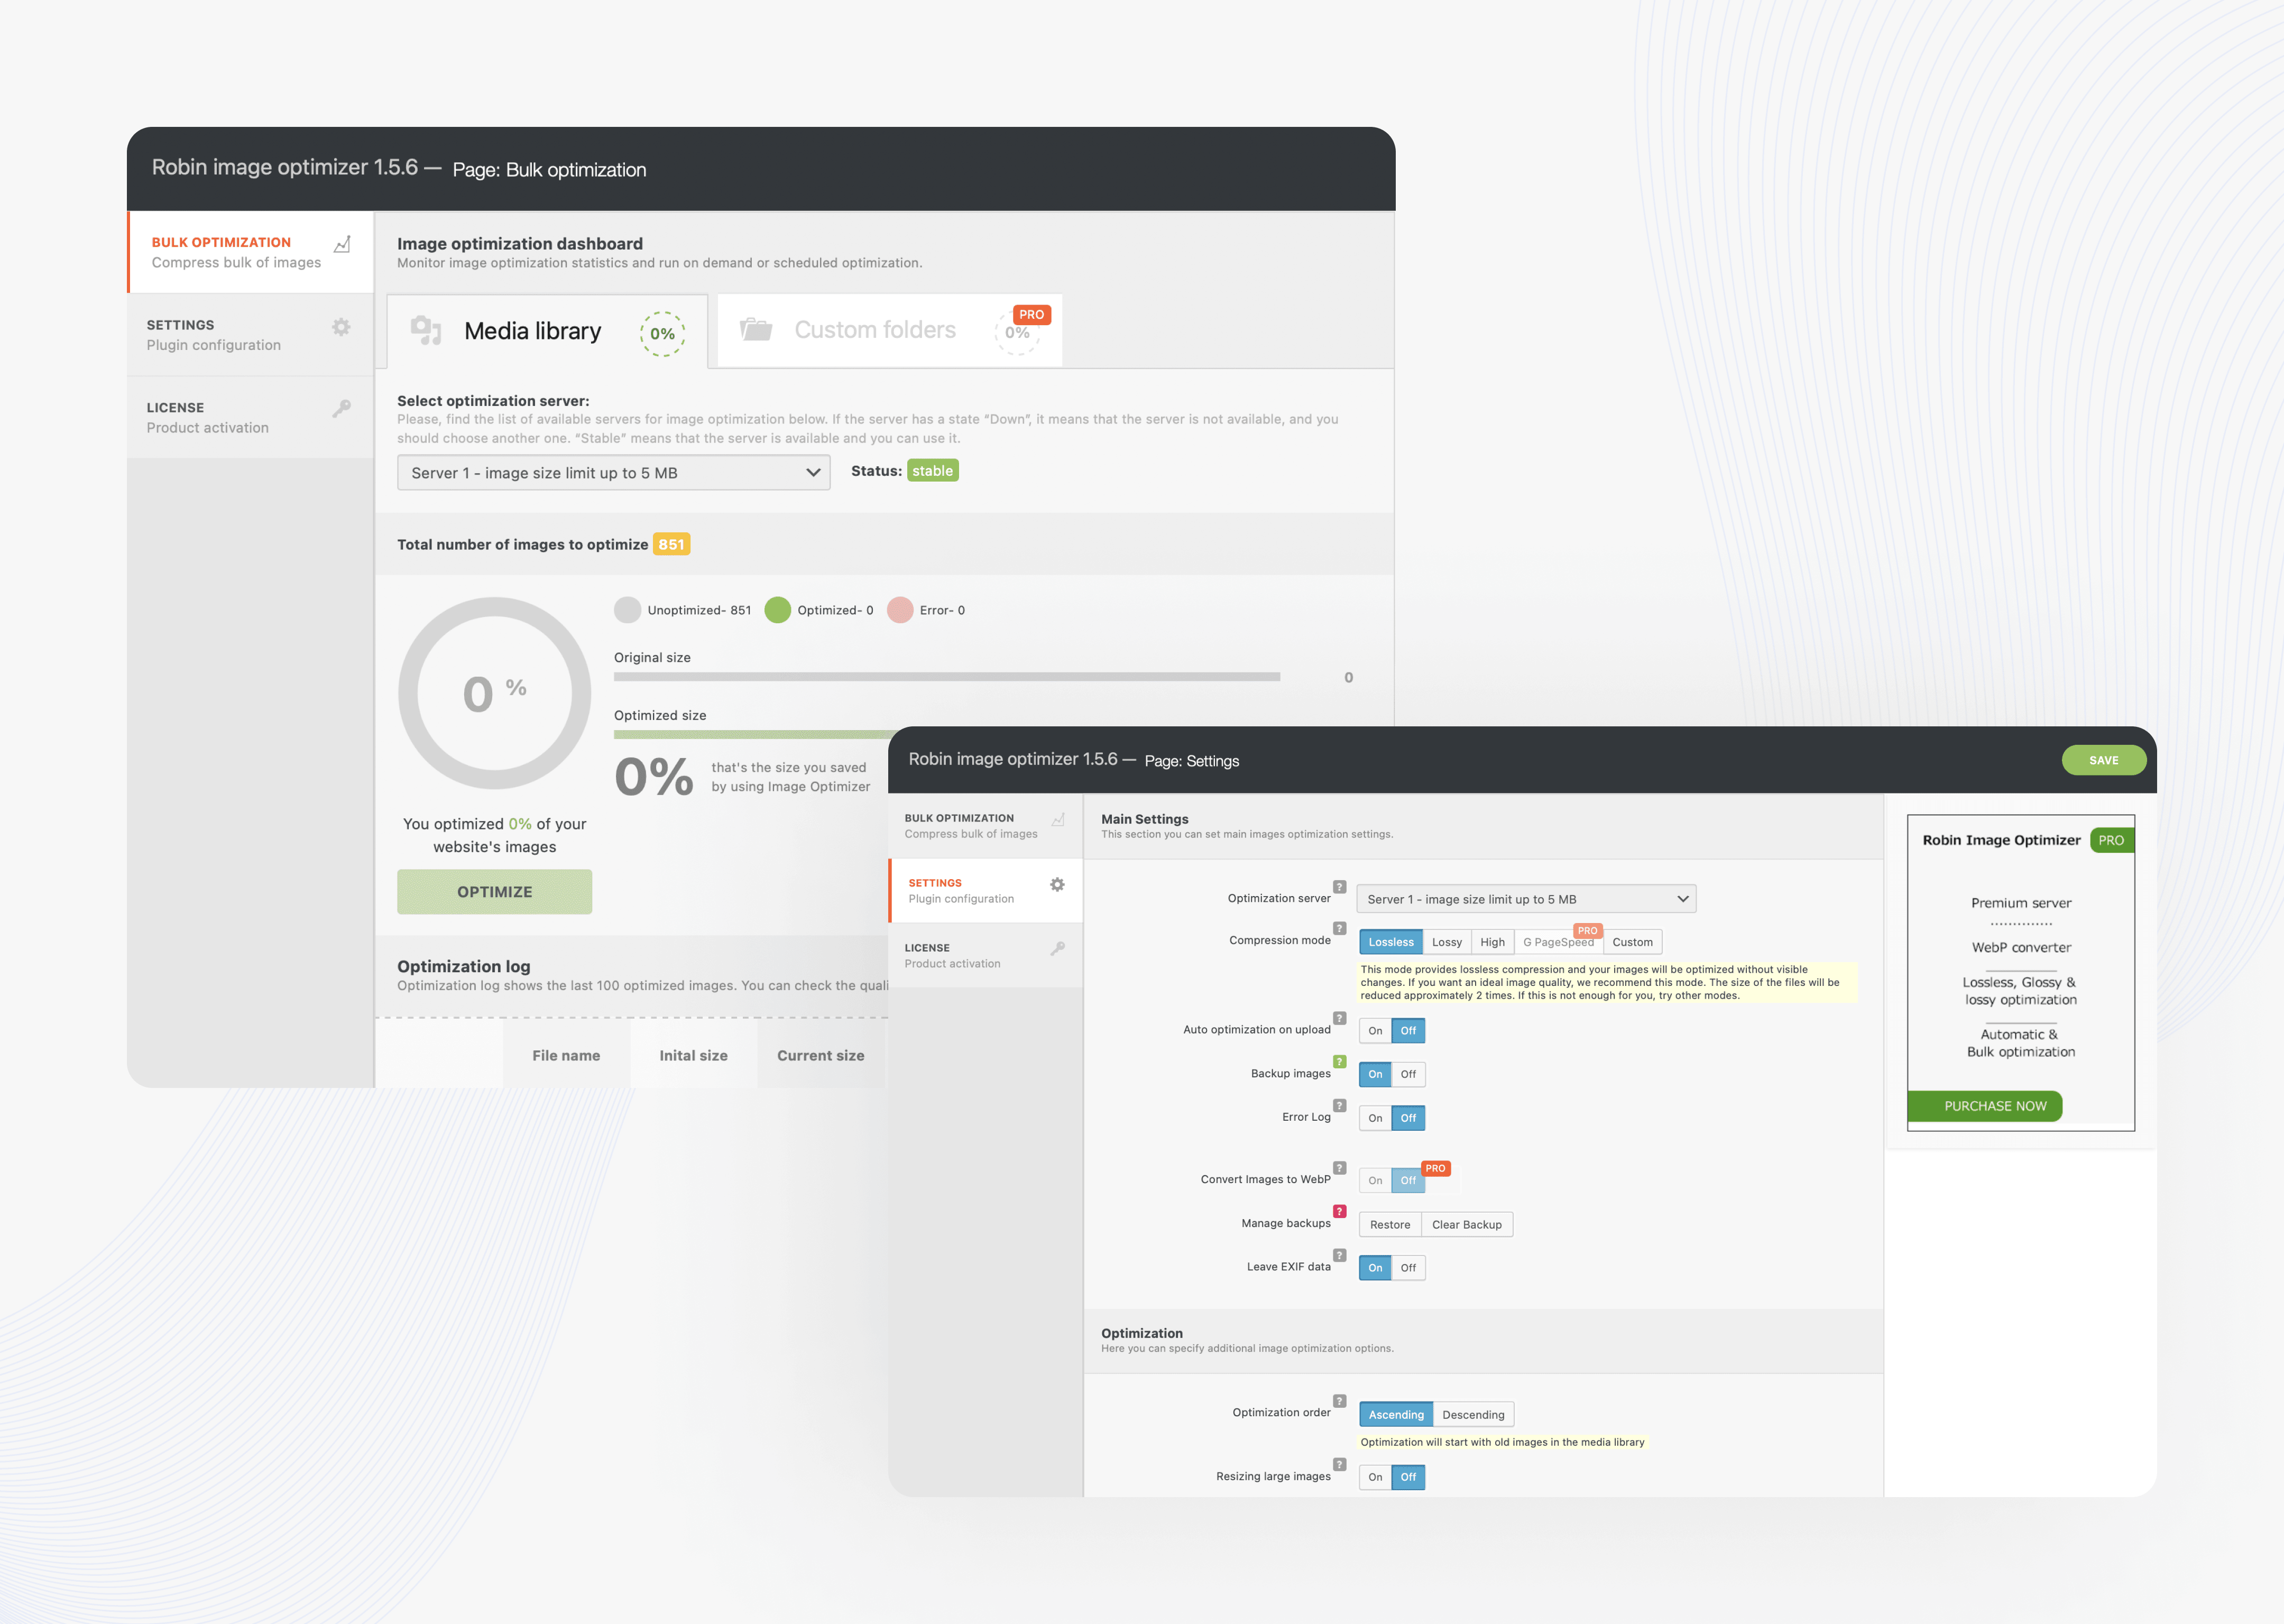
Robin image optimizer is a WordPress-free image optimizer plugin with zero limitations regarding the number of images and optimization quality. The only thing that you may stumble across is the image weight, which shouldn’t exceed 5 MB. A plugin compresses .jpeg and .png files and can cease image weights on 80% without any loss of quality.
But remember, if you pick an image that’s too small for the space, it will appear distorted and fuzzy. Smaller file sizes work best when you want to send an image for someone to glance at.
So be sure you have the right file size you want to work with as you create your web content.
2. Resize images to the optimal dimensions for your site
An excellent way to optimize images is to resize them. For example, if you take a photo on a 24-megapixel camera, the image will be 6000×4000 pixels and might be 16 megabytes in size.
But, you can dramatically reduce the file size by resizing the image. Which image dimensions are best?
It all starts with finding out the right image dimensions needed for your pages. If you upload large images without knowing the size, they are used, and you will surely face website performance issues.
If you doubt which image dimensions to choose, resizing images to a maximum width of 1,500 px is a good start.
You can use a plugin like Resize Image After Upload or Imsanity (if using WordPress) to take care of resizing for you, and also do a bulk resize of all your previously uploaded images while you’re at it.
Also, most image editors, such as Photoshop or GIMP, make it easy to resize or crop images.
3. Optimize images for SEO
Optimizing images for Google and other search engines is not only about resizing or reducing but also a way to increase the site’s position in the search results and increase website traffic. To achieve this, we need to name images strategically, use the right alt text, build image sitemaps and ensure that they index correctly with search engines.
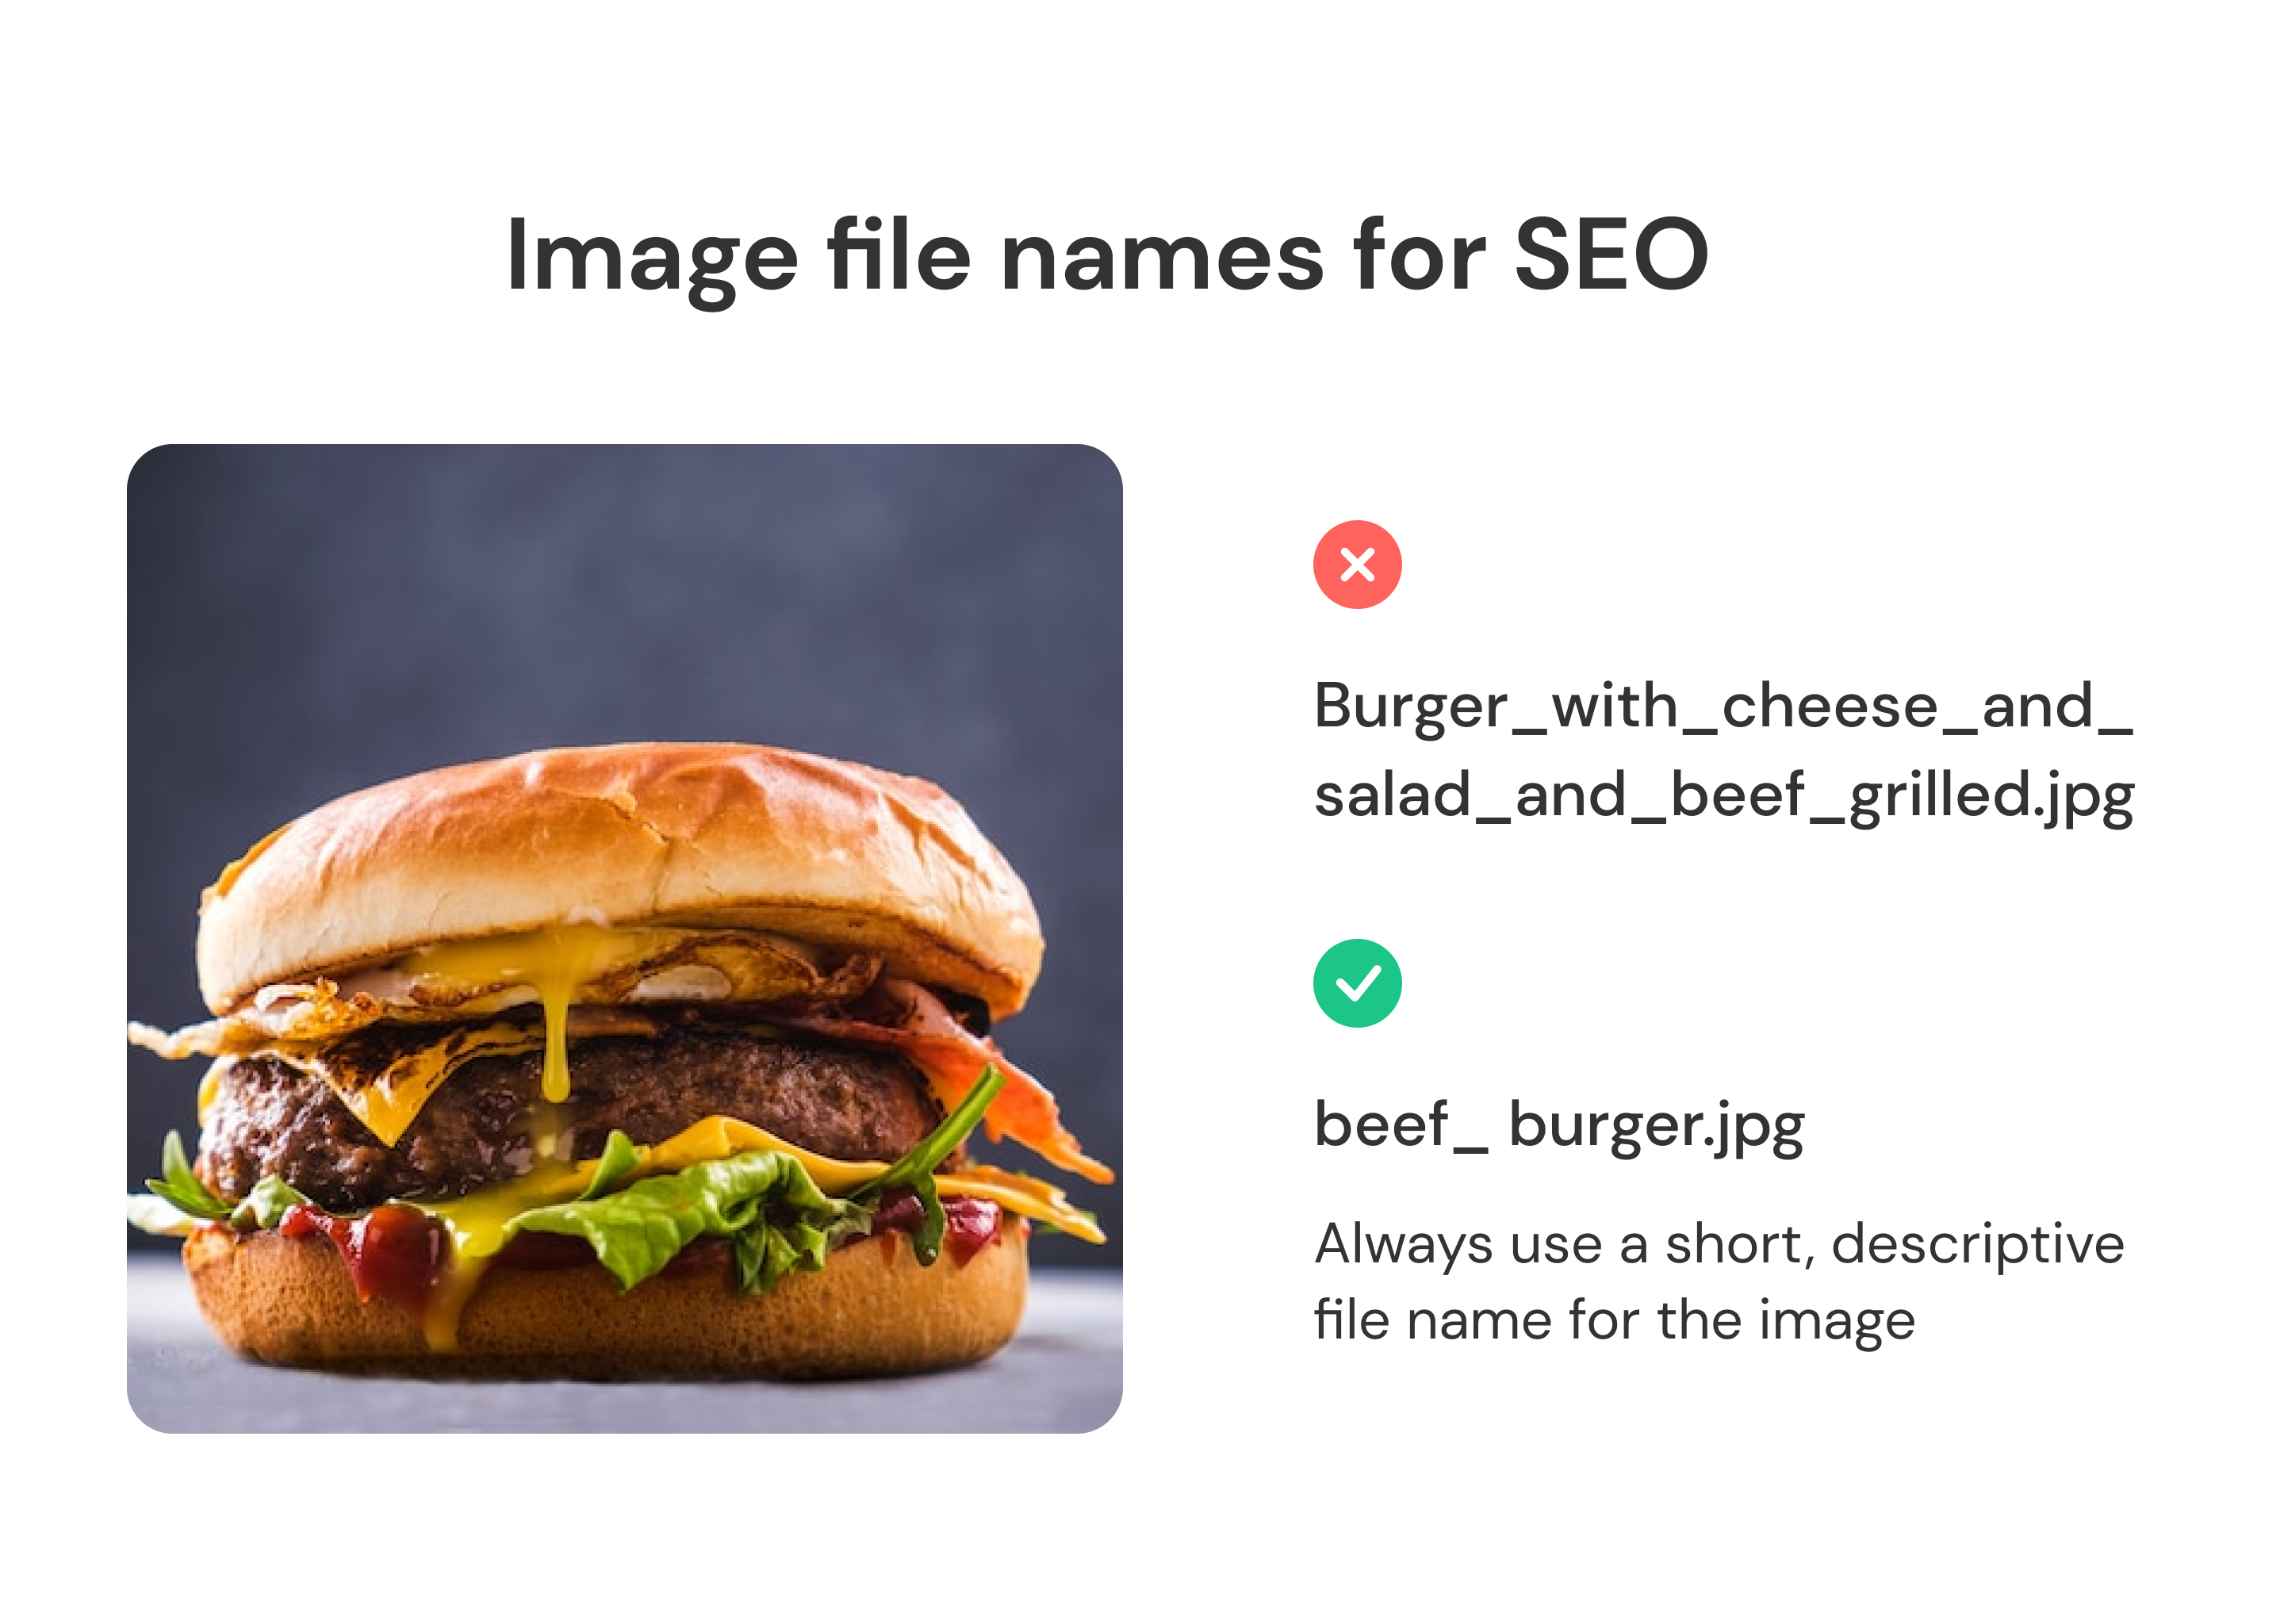
We recommend naming your image file names something similar to your post’s content and or keyword you are focusing on because search engine bots and crawlers see and analyze your file.
Also, use hyphens when there are multiple words. Search engines, such as Google, see hyphens as a separator. Don’t use underscores, otherwise, Google will read everything as one word.
For example, if you have a food delivery site, then the image with a burger should name something like this burger.jpg.
At the same time, the name should not be super-informative and long.
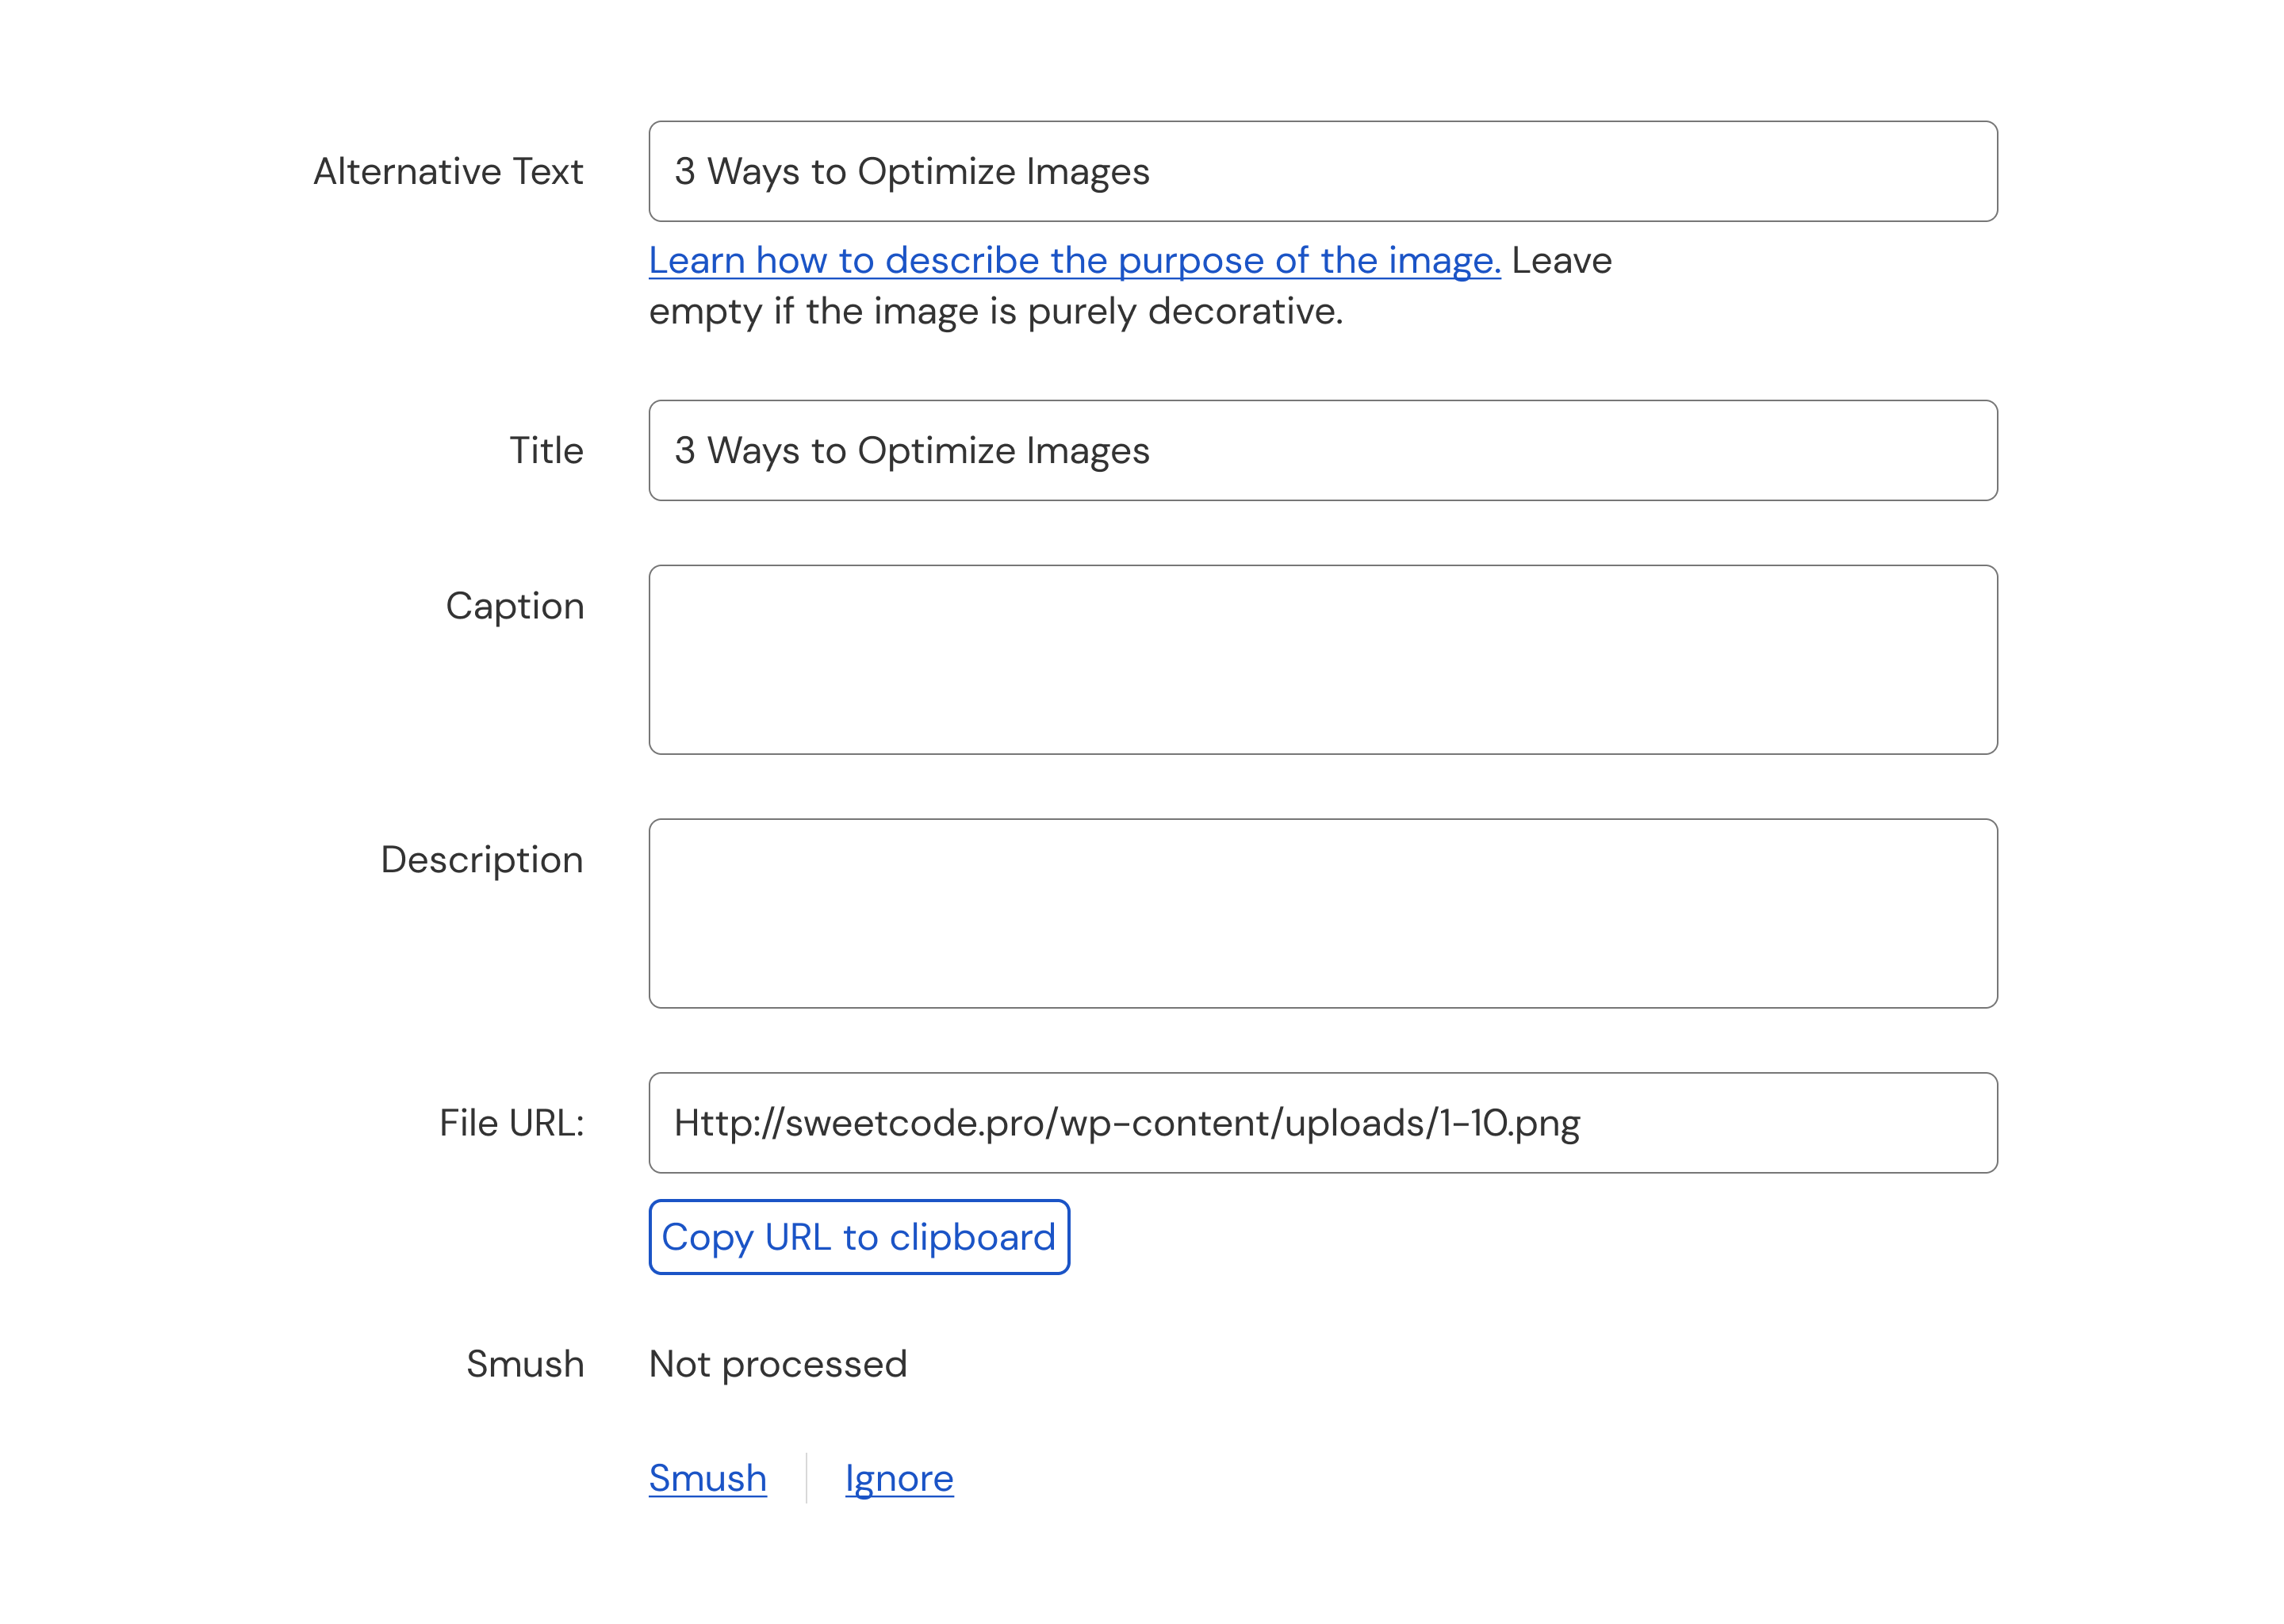
 – Image alt text
Alt text is the easy-to-understand image description, allowing search engines to crawl and rank your website more easily, making it visible to more potential clients. One of the significant benefits of alt text is its role in helping visually impaired readers understand your content when using screen-reading tools. The alt text appears in place of an image on a webpage if the image doesn’t load on a screen.
It should be short yet descriptive, detailed, and accurate. Every image on a page should have alt text. If you are using a CMS like WordPress, there is a field to input the alt text when you upload your image. Otherwise, you can include them in your HTML.
– Image sitemap
Through Google Image Sitemaps, Google receives metadata regarding the images contained on a website and allows you to indicate images on your site that you want Google to crawl and index.
To provide Google with information regarding images on the website, the site owner must add relevant details to the standard Sitemap. This includes the type of image, subject matter, caption, title, geographic location, and license. The process lets site owners identify the most important images on each page.
So, we conclude our guide for better site performance by optimizing images! To see the impact this has made on your site, you can run a speed test—for example, Google PageSpeed Insights.
You will see increased user engagement and new visitor traffic by designing with image optimization in mind. Our team also can help you with it – contact us at [email protected] to give your brand a boost with images that make your website accessible, well-designed, and user-friendly.